Brown butter scallops with parmesan risottorown butter scallops with parmesan risotto

So Luscious! So Fancy! So Christmas-Date-Night-In Perfect.

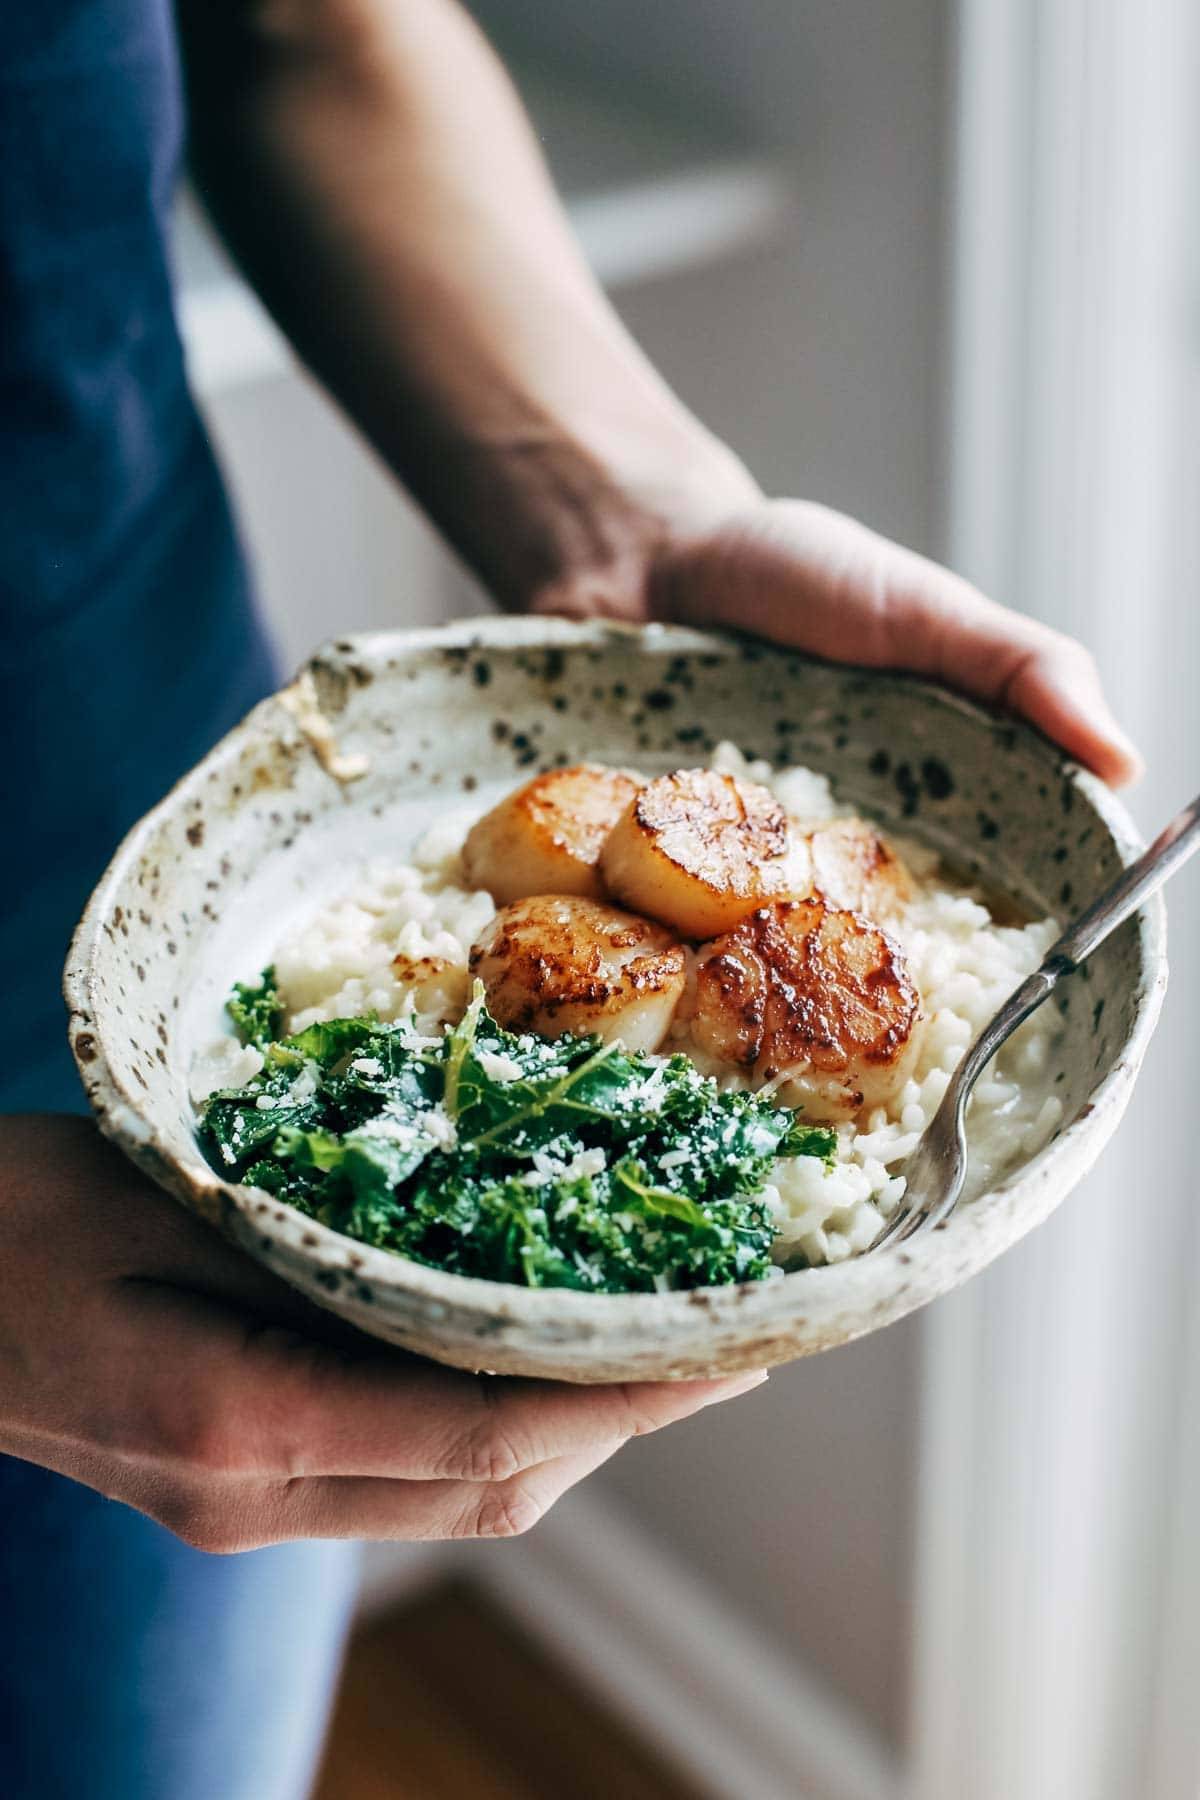
Say hello to this bowl of brown butter scallops + risotto that is about to take you by storm with all of its brown butter glory.

But back it up. Brown butter is just the beginning, er, more accurately, the finishing touch.

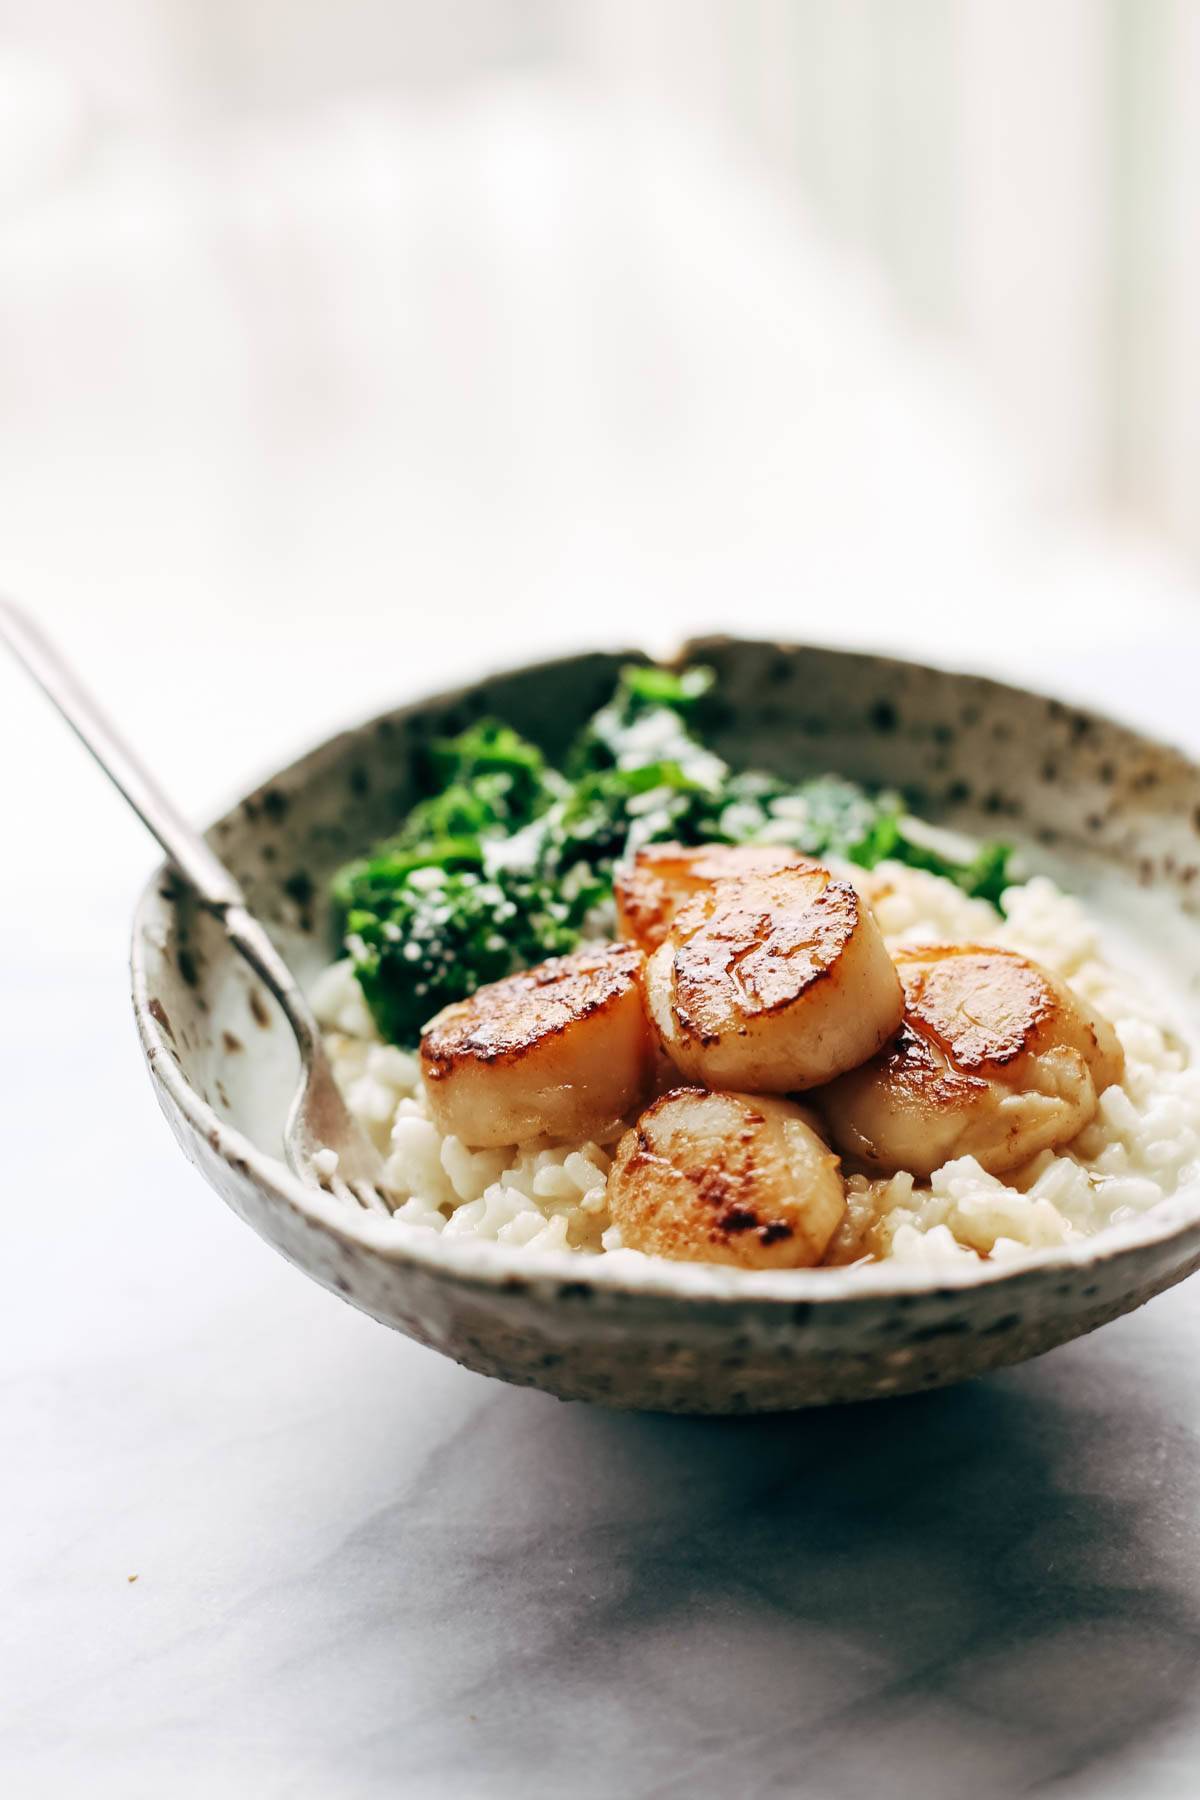
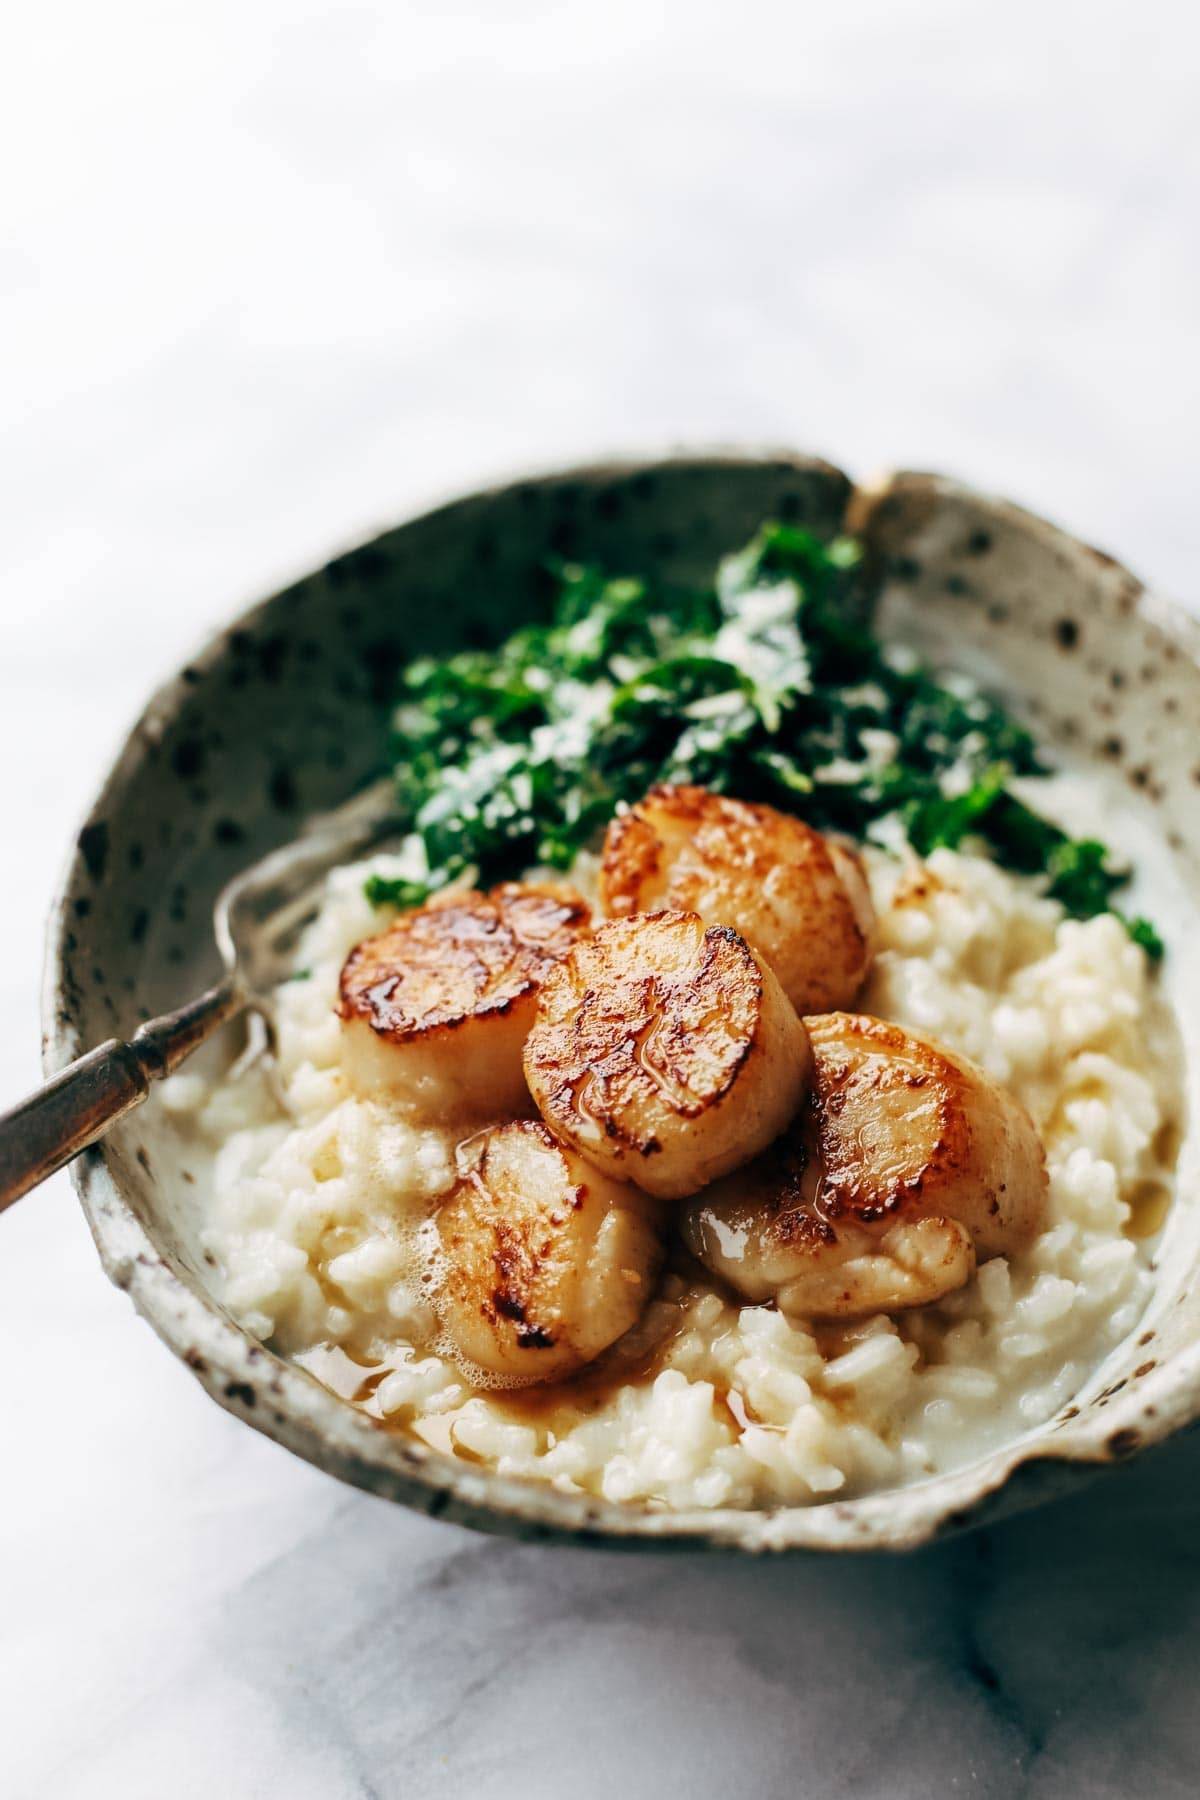
This feels-like-a-fancy-restaurant meal combines the love that is a pile of creamy Parmesan risotto (with a splash of white wine bcz this is a fancy restaurant, remember?) and seared scallops, garlic sautéed greens, and THEN, like we weren’t already  enough, the brown butter gets drizzled all up on top of everything. Just so you can go to heaven and back again in one bite.

In real life, while I was making this, Bjork walked into the kitchen and announced that our house smelled like a fancy restaurant.

Like, are you even ready for this level of food celebrity status? Prepare yourself.

Brown Butter Scallops with Parmesan Risotto! So Luscious! So Fancy! So Christmas-Date-Night-In Perfect. Say hello to this delicious meal! | pinchofyum.com
😁

Two of my very favorite things about this recipe are the process – or maybe better called an adventure  – of searing the scallops (um, PS. hi, I’m a complete novice at the scallop game, so just wanted to throw that out there) and the slow simmering of the risotto.

I am usually all-in for quick and easy meals that require little to no hands-on time. I embrace slow cookers (see also: Midwest born and raised). Short ingredient lists inspire me. I love fast food processor meals, because you can count Magic Green Sauce as a meal, right?

But slow, constantly-stirred, creamy risotto is not necessarily fast, and I love it all the more because of it.

There is something so super zen, so calming and relaxing for your always-on-the-go self when you’re standing over the stove and gradually stirring the liquid into the barely-bubbling pan of creamy arborio rice while talking to your people sitting on the other side of the counter. You’re just lazily pouring, stirring, pouring, stirring, and together you’re just talk-talk-talking. And your house smells amazing like you CAN’T EVEN because garlic + butter + white wine is basically the same thing as aromatherapy. And obviously you can and will manage to find time between stirs to take five hundred bites, you know, just to test it. It’s the purist form of food therapy.

Brown Butter Scallops with Parmesan Risotto! So Luscious! So Fancy! So Christmas-Date-Night-In Perfect. Say hello to this delicious meal! | pinchofyum.com

The scallops are almost sweet and so perfectly light and luscious, but let’s tell it like it is: searing them might not be food therapy and might require some YouTube studying beforehand.

A few things that help:

  • use a non-stick pan
  • use grapeseed oil (high smoke point)
  • get that pan pretty darn hot
  • shake the pan around with the scallops in there so they don’t stick and tear
  • keep a fire extinguisher handy
  • just kidding
  • maybe

For real: You can do this. We can do this.

👇

Fancy restaurant status is coming at you in the form of golden brown scallops, creamy Parmesan risotto, and garlic sautéed greens! 

Brown Butter Scallops with Parmesan Risotto! So Luscious! So Fancy! So Christmas-Date-Night-In Perfect. Say hello to this delicious meal! | pinchofyum.com
Brown Butter Scallops in a bowl with risotto and kale.

brown butter scallops with parmesan risotto


DESCRIPTION

Brown Butter Scallops with Parmesan Risotto! So Luscious! So Fancy! So Christmas-Date-Night-In Perfect. Say hello to this delicious meal!


INGREDIENTS

parmesan risotto:

  • 1 tablespoon butter
  • 1 minced clove garlic or 1 minced shallot (or both)
  • 1 cup arborio rice
  • 1/2 cup white wine
  • 3-ish cups of chicken broth
  • 1/2 cup Parmesan cheese

seared scallops:

  • 1 tablespoon grapeseed oil
  • 1 pound jumbo scallops

sauteed spinach or kale:

  • 1 tablespoon olive oil
  • 1 clove minced garlic
  • 4 cups spinach or kale

brown butter:

  • 3 tablespoons butter

INSTRUCTIONS

  1. For the Risotto: In a large non-stick skillet over medium heat, melt the butter. Add the garlic or shallots and saute for a minute or two, until soft and fragrant. Add the arborio rice, stir to coat with butter. Add the white wine and enjoy the sizzles. Add the broth, 1/2 cup at a time, and simmer/stir after each addition until the rice is soft and creamy. I usually err on the side of more liquid to get a creamier texture. Add the parmesan and stir until incorporated. Salt + pepp to taste.
  2. For the Seared Scallops: Heat oil in nonstick skillet. Pat scallops dry (VERY DRY, as dry as possible), sprinkle with salt, and add to pan. They should sizzle (if not, you need a hotter pan.) Shake gently to prevent sticking. After 2-3 minutes, flip each scallop over. They should have a pretty golden brown exterior and an opaque inside. Transfer to a paper towel lined plate to absorb excess oil. Serve immediately.
  3. For the Sautéed Spinach: Heat the oil over medium low heat. Add the garlic, stir for a minute to get the flavor going. Add the spinach or kale and stir until wilted.
  4. For the Brown Butter: Put a few tablespoons of butter in a clean skillet over medium heat and stir it while watching it closely – when it starts to look golden and foamy, remove from heat, transfer to a heat-proof bowl to cool slightly, then drizzle over the risotto, scallops, and greens.

Creamy tortellini soup

Dear creamy tortellini soup, with sausage, and spinach, and that rich and creamy tomato broth: ILYSB!

If there is just *one* soup you make this month, absolutely make it this one.

I’m not going to beat around the bush with you. Is it the healthiest: no.

Is it the most delicious, the most memorable, the most cozy, and the most compelling for bringing friends together around a table? Yes.

There’s something a little magical about savory sausage coming together with a sauté trio of onion, carrot, and celery, a generous bit of garlic, fresh spinach, and cheese tortellini, all of it enveloped in a rich and creamy base that is just tangy and tomatoey enough to cut the richness. Magical, I guess, or you could also just say alarmingly easy to eat bowl after bowl after bowl.

It’s one of those meals that you make and then you can’t stop thinking about the next day which is what happened to us, when our friend Ang was casually like, “hey come over for soup,” and we left 100% changed human beings, and then I asked her if I could please put this recipe on POY immediately because I COULDN’T STOP THINKING ABOUT IT.

She also made us a loaf of no-knead cheese bread for dunking, sopping, and generally soup-scooping, which is definitely what I’d recommend with this particular tortellini soup situation.

LET’S TALK ABOUT HOW TO MAKE THIS CREAMY TORTELLINI SOUP

Step 1: Brown your sausage. Add your veggies. IT SMELLS SO GOOD.

Step 2: Hello garlic, spices, and tomato paste. We’re in soup-base territory now.

Step 3: Layer in that wine, flour, and broth.

Step 4: Add cream and get it bubblin. Then: tortellini and spinach, let it simmer until it’s all cooked up. Get your crusty bread ready. Annnnd go!

If you’re into all the cozy vibes going on here, here are a few more ways to make it happen with all the soup:

Alright. You are ready. Tonight it’s just you, your coziest sweater (okay be real, sweatpants) and a deep bowl of creamy tortellini soup. ♡ A BIG WINNING MOMENT.

ang’s creamy tortellini soup


  • Prep Time: 20 minutes
  • Cook Time: 20 minutes
  • Yield: 6–8 servings 1x

DESCRIPTION

Creamy Tortellini Soup that is comforting, cozy, and so yummy! Rich and creamy tomato broth, cheesy tortellini, fresh spinach, and Italian sausage.


INGREDIENTS

  • 1 lb. Italian sausage
  • 1 small yellow onion, diced
  • celery stalks, diced
  • 2 large carrots, peeled and diced
  • garlic cloves, minced
  • 1 teaspoon kosher sea salt
  • 1/2 teaspoon ground black pepper
  • 1/2 teaspoon Italian seasoning
  • 1 teaspoon fennel seed, crushed or chopped
  • 1 6-oz. can tomato paste
  • 1/2 cup dry white wine
  • ½  cup all-purpose flour
  • 6–7 cups chicken broth
  • 14 oz. refrigerated cheese tortellini
  • 2 cups half and half or heavy cream
  • 1 handful chopped fresh spinach

INSTRUCTIONS

  1. In a large stockpot set over medium-high, cook the sausage, breaking up into little pieces. When sausage is mostly browned, add onion, celery and carrot, sauté for 5 minutes or until the vegetables are soft. 
  2. Add the garlic, spices, and tomato paste; sauté for an additional 3-5 minutes, or until fragrant, stirring occasionally to prevent it from burning.
  3. Add wine and let it cook out for a few minutes. Stir the flour into the sausage and cook for 1 minute. It’ll be sticky and dry. Gradually add in the chicken broth, stir to combine. Continue cooking until the mixture reaches a simmer, then reduce heat to low and simmer for 15 minutes.
  4. Add the cream, then bring it to a low simmer. Add the tortellini and spinach. Cook just until tortellini is al dente, per package directions. Serve with fresh parsley and Parmesan and dunk with cheese bread! Oh my goodness. This is living.

Homemade brownies

Stack of Homemade Brownies

It’s the month of chocolate! And seeing as how this is the week of Valentine’s Day, we should probably be consuming chocolate on a daily basis. Wait, I think I already do that? I say skip the flowers, and store bought chocolates – this right here is the way to anyone’s heart. Rich, fudgy Homemade Brownies, loaded with SO. MUCH. CHOCOLATE.

Stack of brownies with ice cream on top.

HOW TO MAKE HOMEMADE BROWNIES:

  • Get out a big bowl, a whisk and a rubber spatula.
  • Whisk up your dry ingredients: flour, cocoa powder, sugars, salt, chocolate chips and espresso powder.
  • Add the wet ingredients right into the dry ingredients: eggs, oil, vanilla and water.
  • Stir until combined, then spread the batter into a pan and bake.

Homemade BrowniesPauseUnmuteLoaded: 0%Remaining Time -0:24Fullscreen

Once you remove the brownies from the oven, let them cool slightly. These are best served warm, when the chocolate chips are slightly melted, creating a rich, smooth flavor that can’t be beat! If you’re baking these for a later time, or have brownies leftover, tightly cover and store them. When you’re ready to serve, reheat them in the microwave until the chocolate chips soften.

Homemade brownie batter

TIPS FOR HOMEMADE BROWNIES:

  • Do NOT over bake: Brownies baked too long will end up dry and crumbly. Start checking the brownies 5-10 minutes before the recipe says that they should be done. They are done when the edges are set and a toothpick inserted into the center comes out with fudgy crumbs, but no raw batter. There are a lot of melty chocolate chips in these brownies, so don’t mistakenly think that melted chocolate means that they’re underdone.
  • Add Chocolate Chips: Adding chocolate chips to brownie batter helps to ensure a fudgy brownie. Those chips melt slightly and make these super chocolaty. Use your favorite chocolate chips: milk chocolate for a sweeter brownie, semisweet for a classic flavor or bittersweet for a dark chocolate flavor. Sometimes I even use a combination of chips.
  • Line your baking pan: Line your baking pan with foil or parchment paper for easy removal and clean up. You can lift the whole batch of brownies right out of the pan by lifting the overhanging foil or parchment paper.
  • Espresso powder:  A little espresso powder really intensifies the chocolate flavor in these brownies. It does not impart a coffee flavor, it simply deepens the chocolate. If you don’t have espresso powder, you can skip it.
Stack of Homemade Brownies

WHAT MAKES BROWNIES FUDGY?

Several things make brownies fudgy instead of cakey. These Homemade Brownies fall into the “fudgy” category, here’s why:

  1. Fat to flour ratio: These brownies have a high fat to flour ratio. They have more fat (oil, chocolate chips) than flour. This creates a dense, fudgy texture.
  2. No leavening: These brownies contain no baking soda or baking powder, which means there is little-to-no rise when they bake.
  3. Chocolate Chips: This batter contains a whole cup of chocolate chips. While baking, the chocolate chips melt just slightly, creating a moist, fudgy texture. Don’t skip the chocolate chips – they add a lot to this recipe.

So there you have it – the best Homemade Brownies! Chewy edges, dense and fudgy centers and a shiny crackly top. Pure brownie perfection.

Stack of brownies
Brownie in a mug topped with vanilla ice cream and raspberries.

Homemade Brownies

My favorite Homemade Brownies – Moist, fudgy, chewy and absolutely loaded with chocolate! This easy one-bowl recipe comes together in minutes. CourseDessert CuisineAmerican Prep Time15 minutes Cook Time30 minutes Total Time45 minutes Servings12 Calories324kcal AuthorAllison – Celebrating Sweets

Ingredients

  • 2/3 cup unsweetened cocoa powder
  • 1 1/2 cups granulated sugar
  • 1/3 cup powdered sugar
  • 1/2 teaspoon salt
  • 1 cup all purpose flour
  • 2 teaspoons espresso powderoptional
  • 1 cup chocolate chips milk chocolate, semisweet or bittersweet (your choice)
  • 3 large eggs
  • 1/2 cup vegetable or canola oil
  • 2 tablespoons water
  • 2 teaspoons pure vanilla extract

Instructions

  • Preheat oven to 350°F. Line a 9×9 square pan* with foil or parchment paper, leaving a couple inches of overhang on two sides (this will allow you to lift the whole tray of brownies out of the pan for easy removal). Grease the foil/parchment.
  • In a large bowl combine cocoa powder, sugars, salt, flour, espresso powder, and chocolate chips. Whisk until combined. Add eggs, oil, water and vanilla and stir with a rubber spatula until combined (it will be fairly thick).
  • Pour the batter into the prepared pan and smooth the top. Bake for 25-35 minutes (begin checking at 25 minutes). The brownies are done when a toothpick inserted into the center comes out without raw batter on it (there may be some fudgy crumbs on the toothpick – that’s OK). Be careful not to over bake. Remove from the oven and place on a cooling rack. 
  • I prefer this recipe baked in a 9×9 square pan, the brownies cook evenly, and they are the perfect thickness. If you only have an 8×8 pan, you can use it, but you will need to increase your cook time, and your brownies will be quite a bit thicker. Be extra careful about overbaking in an 8×8, you don’t want the edges overdone.
  • Since ovens vary, and different bakeware can affect the cook time (metal pans cook faster than glass, for instance), it’s important to keep a close eye on these as you approach the end of the baking time. To tell if they’re done, move the pan back and forth, just slightly. The center should not appear jiggly. When you insert a toothpick into the center, it should come out without raw batter on it (fudgy crumbs are OK). If the brownies are not quite done, set a timer and check them every 5 minutes until they are.

Nutrition

Calories: 324kcal | Carbohydrates: 46g | Protein: 4g | Fat: 14g | Saturated Fat: 10g| Cholesterol: 54mg | Sodium: 128mg | Potassium: 109mg | Fiber: 2g | Sugar: 35g| Vitamin A: 110IU | Vitamin C: 0.1mg | Calcium: 33mg | Iron: 1.6mg

9 of the Best Low Carb Snacks and Snack Recipes

I’m a snack monster and while on keto, there aren’t really that many snacks you can have. I’m used to reaching for a bag of chips or maybe if I’m feeling particularly healthy, some fruit. Both fruit and chips are a big NO on the keto diet so I had to find myself some snacks that were low carb and keto friendly because me without snacks just isn’t me at all.

So, if you’re looking for some low-carb, keto friendly snacks, I’ve got your back. These are they things I look for in a snack: crunchy, satisfying, and mindless. The last one is hard because you can’t really mindlessly snack, but the 9 snacks I’m listing here are my absolute favorite because, well, they’re snacks, some of them are crunchy, and all of them are satisfying. Sometimes so satisfying that I eat more than I should. Oops!

Satisfying crunchy, savory, delicious low carb snacks and snack recipes: the best 9 low carb snacks you can make and buy #keto #ketofriendly #lowcarb #snacks #recipes

Whisps/Parm Crisps
This are my go-to when I’m looking for the satisfying crunch of a chip. They’re crispy, they’re crunchy, and the best part is they’re made of just cheese! You know that delicious thing that happens when lasagna bakes and there are crispy crunchy, cheesy edges? Or maybe when cheese falls out of your grilled cheese? That stuff is frico cheese: what happens to cheese when it melts then caramelizes into a crispy-crunchy lacy cracker. Whisps/Parm Crisps are those cheesy one ingredient crackers. You can definitely make them at home easily, but I like having a bag (or six) in the cupboard for when I need that chip like snack. My favorite flavors are the sesame parm crisps for the nuttiness and the asiago and pepper jack cheese for the spiceThe original ones are good too. The best part is that they’re 0 grams of carbs!

Macros per serving: they vary per flavor, but they’re about 100 calories, 7 grams fat, and 0 carbs.


Satisfying crunchy, savory, delicious low carb snacks and snack recipes: the best 9 low carb snacks you can make and buy #keto #ketofriendly #lowcarb #snacks #recipes

Crispy Seaweed
Okay, this stuff is my kryptonite. I mean, I love regular seaweed snacks too but these are seaweed snacks on another level. If you love nori/seaweed, you will love these snacks, trust me. They’re like a seaweed chip. They have more heft and crunch compared to regular seaweed and they are just so crisp and light and addictive. I’ve loved this brand of crispy seaweed even before I started keto so I was so happy when I discovered that they are only 1 gram of net carbs per serving. That means if you eat the whole bag, like I do, almost every time, it’s only 2 grams for the whole thing! If you’re using CarbManager to enter your macros, be sure to make a custom entry because when I scan the bar code in, it’s wrong. I don’t think I can live without these. They are other flavors, but I stick to the original because some of the other ones have sugar in them.

Macros per serving: 70 calories, 5 grams fat, 1 gram net carbs


Satisfying crunchy, savory, delicious low carb snacks and snack recipes: the best 9 low carb snacks you can make and buy #keto #ketofriendly #lowcarb #snacks #recipes

Edamame/Dry Roasted Edamame
I love edamame and it’s one of the few appetizers that you can still have if you’re going out with friends for sushi so it’s the perfect combination of sexy and cute. Low carb and tasty, especially if you season them with a little bit of your favorite spice blend. I like to keep it simple with salt and pepper but I have been know to spice it up with Japanese shichimi togarashi/seven spice. It adds that extra bit of flavor that you need sometimes. I also really like roasted edamame. They’re super crunchy and a bit dry so if you don’t like dry or crunchy they might not be for you, but they’re just as satisfying as nuts to me, probably because of the salt, but lower calories so I love them.

Macros per serving for edamame: 100 calories, 4 grams fat, 3 grams net carbs
Macros per serving for dry roasted edamame: 65 calories, 2 grams fat, 2 grams net carbs


Satisfying crunchy, savory, delicious low carb snacks and snack recipes: the best 9 low carb snacks you can make and buy #keto #ketofriendly #lowcarb #snacks #recipes

Macadamia Nuts
I’ve loved mac nuts since forever: they’re buttery, crunchy, and oh so satisfying. They also happen to be the lowest carb of all the nuts (along with Brazil nuts). If you’re an it lover and nuts are one of your go-to snacks, you should definitely be switching to macadamia nuts. Almonds, cashews, and pistachios are actually high in carbs, so just buy a big bag of mac nuts at Costco and go to town. Pecans are fairly low in carbs too, but I don’t find them as satisfying as macadamias. As a bonus, macadamias are pretty high in fat too, which makes it the perfect keto nut.

Macros per serving: 115 calories, 13 grams fat, 1 gram net carbs


Satisfying crunchy, savory, delicious low carb snacks and snack recipes: the best 9 low carb snacks you can make and buy #keto #ketofriendly #lowcarb #snacks #recipes

Cheese of all Kinds
There are so many kinds of cheeses in the world and I love them all – with the exception of very blue cheese. And now, with the whole low-carb trend, all of the cheese companies are putting out individual snack sizes of cheese. There’s more than just cheese sticks and cheese strings out there friends! Although I do love a good cheese stick. My favorites are: baby brie, bite-sized fresh mozzarella balls, marble cheddar sticks, and low moisture mozzarella balls. I love that I can have a mini cheese plate made up of ALL THE CHEESE. Sometimes I add a few macadamias and the combo of salty and creamy is the perfect snack. Pro tip: always check the nutritional info on cheese because some of them have carbs in them. I always buy the ones that have a less than 1 gram or 0 grams of carbs.

Macros per serving: they vary per cheese, but they’re usually about 100 calories, 5-8 grams of fat, and 0 carbs


Satisfying crunchy, savory, delicious low carb snacks and snack recipes: the best 9 low carb snacks you can make and buy #keto #ketofriendly #lowcarb #snacks #recipes

Fry Your Own Cheese Crisps
Yep, I know I already mentioned store-bought cheese crips, but there’s something about making your own cheese crisps, when you have time that is so much better. First off, they are kind of warm, which makes them just a little more cozy. Second, if you’re feeling extra, you can make them into little taco shapes and use them to hold things. No matter how you eat them, they’re a good thing. All you need to do is cut up some cheese into small pieces and heat them in a non-stick pan over medium-low heat until the cheese melts and starts to bubble. When the cheese is crispy looking, remove the pan from the heat, let cool slightly, then enjoy. Warm and cheesy and good like picking off the cheesy bits from your favorite cheesy baked casserole.

Macros per serving: they vary per cheese, but they’re usually about 100 calories, 5-8 grams fat, and 0 carbs


Ginger Scallion Sauce | www.iamafoodblog.com

Jammy Eggs with Scallion Oil
This probably isn’t the most quick snack, unless you have a batch of scallion oil in the fridge (it’s a very delicious way to add fat to your keto diet) but it’s very savory and extremely satisfying. Just make some jammy eggs (6 and a half minutes), peel them, cut them in half, and top each side with 1/2 tablespoon of scallion oil. You get protein and fat making them a cute little keto bite.

Macros per serving: 198 calories, 19 grams fat, 1 gram net carbs


Satisfying crunchy, savory, delicious low carb snacks and snack recipes: the best 9 low carb snacks you can make and buy #keto #ketofriendly #lowcarb #snacks #recipes

Quick Deviled Eggs with Everything Bagel Spice
I love everything bagel spice because, well, it makes things taste like bagels. Not really, who are we kidding, but it actually is a nice savory spice blend that adds a huge hit of flavor without any pesky carbs. I like to hard boil an egg, mash up the yolk with 1 tablespoon of kewpie mayo, scoop it back into the whites and sprinkle generously with everything bagel spice. I could make a meal out of these and to be honest, I have.

Macros per serving: 178 calories, 15 grams fat, 0 carbs


Satisfying crunchy, savory, delicious low carb snacks and snack recipes: the best 9 low carb snacks you can make and buy #keto #ketofriendly #lowcarb #snacks #recipes

Cheesy Egg Taco
This is probably my most favorite way of eating cheese and eggs together. I got the idea from @julesfood over on instagram. You can hold your cheesy egg up like a taco and it’s crispy, gooey, and so GOOD. I don’t make them that often because when I do I feel like I immediately want to make another but really, the macros on this snack are amazing so I should just make them two at a time. This is how you do it: heat up 1/2 tablespoon butter in a small non-stick pan. Evenly sprinkle on 1/4 cup grated cheese and let it melt. When melty, add the egg and cook until the egg is done to your liking. Turn up the heat at the end for a bit so the cheese gets crispy, then remove the heat from the pan and let the cheese solidify a bit. Slide out of the pan and enjoy!

Macros per serving: 208 calories, 17 grams fat, 1 gram net carbs

Happy snacking!

7 Low Carb Keto Friendly Recipes for Your Next Tailgate Party

It’s tailgating season! Which means tailgating parties, which means SNACKS! Although, who am I really kidding? I have no idea what the heck tailgating season is. I know it has something to do with football and the fall and I absolutely love fall and I’m in deep with snacks, so I’m all for the tailgating. Really, what I end up doing is just making a bunch of snacks and calling it a tailgate even if there’s no sports involved. Sacrilegious I know, but how could anyone be upset if there are snacks involved?

I don’t now about you, but the hardest thing for me is not eating snacks at a party. Especially if I’m trying to be good and do the low-carb keto thing. Essentially all the snacks in the world are carb-alicious. But, if you’re trying to keep it low-carb and keto, these snacks are here for you. Make ‘em and bring ‘em to any tailgate party you’re going to so you don’t feel like your missing out!

Seven Layer Dip Recipe - www.iamafoodblog.com

7 Layer Dip
Um, is it just me or do you like to eat dip with a spoon? I mean, don’t get me wrong, I LOVE tortilla chips but since they’re like 10 thousand carbs per chip, I’m down for using a spoon to eat dip. Especially when it’s seven layers of the good stuff: taco meat, guacamole, salsa, sour cream, cheese, jalapeños, and green onions. I put these guys in super cute little individual cups which means: a.) they’re perfect for eating with a spoon like a weird savory pudding cup and b.) no one else’s pesky tortilla chip crumbs will contaminate your carb-free life.

miso tuna salad recipe - www.iamafoodblog.com

Miso Tuna Salad
Give me ALL the tuna salad, especially when it’s on seaweed and seasoned with miso. This is kind of like a little sushi feel action with the tuna and miso and seaweed. Normally I’d eat the heck out of this with crackers, but really, I love making little seaweed cones and scooping tuna salad into them.

jalapeno popper deviled eggs recipe - www.iamafoodblog.com

Jalapeño Popper Deviled Eggs
Deviled eggs are a low-carb/keto friendly DREAM. I’ve loved deviled eggs since forever and even though they’re not super trendy (Mike always says that I’m like a grandma when it comes to may taste in food) I love them. Bite-sized, creamy, and so much potential for flavor! If you love jalapeño poppers, these eggs have all the right flavors: crispy bacon (well, it was pancetta, but you can use bacon), cheddar, cream cheese, and spicy jalapeños. Ooh, maybe a drizzle of ranch on to would be good too!

Crispy Air Fryer Kale Chips | www.iamafoodblog.com

Air Fryer Kale Chips
Do you miss chips? Me too, me too. But, at least you can have kale chips, right? Not quite the same, but they’ll do in a pinch. I’ve found that the easiest way to make crispy kale chips is in the air fryer. They get shatteringly crisp and super addictive. I try not to do this one too much because technically kale is on the carb-y side, but when you need the crunch, you gotta do what you gotta do.

These low carb, keto friendly piri piri pork meatballs bring the spice and flavor. They’re baked in the oven for maximum ease and are served with cooling Greek yogurt for a tangy, creamy contrast. No more breadcrumbs! #piripiri #meatballs #recipes #dinner #bakedmeatballs #lowcarb #keto #ketorecipes #ketofriendly

Piri Piri Meatballs
Hello meatballs! Everyone loves meatballs at a party, especially when they have toothpicks in them, am i right? These meatballs have zero carbs in them and are served up with creamy sour cream or and spicy easy to make Piri Piri sauce. Forget those crockpot sweet n sour meatballs full of carbs, these guys are where it’s at!

Keto Instant Pot carnitas inspired street tacos: Keto friendly low carb street style carnitas inspired tacos with egg “tortillas.” They look just like the real thing and the taste amazing! Crispy pork flavored with oregano and cumin made quick and easy in the Instant Pot. #keto #ketorecipes #instantpot #eggs #macros #porkrecipes #ketoporkrecipes #lowcarb #recipes

Carnitas Tacos
Okay, I will admit it, these are a bit of an endeavor to make. But, they look almost exactly like tacos, they taste amazing, and they’re keto friendly. I mean, what’s not to love? I absolutely love crispy pork carnitas and being able to eat “taco shells” made from eggs is just genius. Zero net carbs and a chance to eat with my hands? Count me in!

If you love chicken and are looking for a tasty recipe that’s easy to cook in the oven or on the grill, this low carb keto friendly chicken souvlaki is for you! #lowcarb #keto #ketofriendly #ketorecipe #chicken #chickenrecipe #recipes #dinner

Chicken Souvlaki
Who doesn’t love meat on a stick? I mean, I think meat on a stick harkens back to our cave people days which means everyone is attracted to meat on a stick, even if you don’t want to admit it. This keto-friendly low carb chicken souvlaki is perfect for tailgating. Make them the night before and them grill ‘em off as you need them. Don’t forget the sour cream for a bit of extra fat – you need it on the keto diet 🙂

Happy snacking friends! May the keto snacks be ever in your favor!

Spicy Chilli Crisp Grilled Cheese

Eating this sandwich is pure bliss. Your fingers will be oily and spicy. You’ll get those oh so addictive cheese pulls and you won’t want to stop. Can’t stop, won’t stop.

Happy grilled cheesing!
xoxo spicy chili crisp and melty cheese,
Mada

You’re 4 ingredients away from the best spicy cheesy grilled cheese you’ll ever eat: spicy chili crisp grilled cheese #grilledcheese #recipes #cheese #chilicrisp #spicy

Spicy Chili Crisp Grilled Cheese

Spicy, savory, crispy grilled cheeseServes 1Prep Time 1 minCook Time 5 minsTotal Time 6 mins

Ingredients

  • 2 slices really good bread
  • 1/2 – 1 cup shredded cheddar
  • chili crisp to taste
  • 1 tbsp butter

Instructions

  • Place the two slices of bread (open faced) on a cutting board. Top the bottom slice of bread with shredded cheddar and dot generously with chili crisp, or to taste.
  • Melt half a tablespoon of butter in a non-stick pan on medium low heat. Carefully add the cheese topped bread and top with the other slice of bread.
  • Cook slowly on medium-low heat until golden brown and toasty. If your cheese isn’t melting as fast as you like, use a lid to cover your sandwich but keep an eye on the bottom, checking every so often so that the bottom doesn’t burn.
  • When it’s golden and toasty, carefully flip your sandwich and continue grilling. The second-side grills a bit faster, so turn the heat down to low and keep a close eye on it. When perfect, remove from the pan, slice (or not) and  enjoy hot!

Spicy Garlicky Noodles

~ 5 INGREDIENTSMAINSMEAT FREERECIPESTHAT NOODLE LIFE

Easy 10 Minute Spicy Garlicky Cheater’s Dan Dan Noodles

This super easy version of dan dan noodles is fast, flavorful, and vegetarian to boot. It’s definitely the answer to: what’s for dinner tonight.Posted December 9, 2019 by Stephanie

Doesn’t it always seem like December is the busiest month? There’s always so many dinners/get togethers to go to and so many errands to run. It almost seems like there isn’t any time to make dinner…unless it’s one of those crazy elaborate dinners you’re making to impress. Or maybe it’s a dinner of cookies. Anyway, this is the super easy noodle bowl you’re going to be making over and over again when you want a fast, easy, flavorful meal that takes just under ten minutes.

To be honest, this technically isn’t dan dan mian/dan dan noodles but it technically is too. See, dan dan noodles are one of those dishes, the kind where there are a thousand variations, even in Sichuan, where they’re from. They can come in soup, they can come more dry, they can have pork, they can be vegetarian, they can be whatever you want, really.

Since this is a cheaters (ie, super easy) version, we’re going to skip out on the meat and the ya cai (classic pickled vegetables) and essentially make a toss and eat noodle bowl. If you can boil noodles and mix sauce in a bowl, you can make these super satisfying spicy noodles.

This super easy cheater’s dan dan noodles is fast, flavorful, and vegetarian to boot. It’s definitely the answer to: what’s for dinner tonight. #dandannoodles #dandan #vegetarian #noodles #chinesefood #betterthantakeout #sesamenoodles #peanutnoodles #recipes #recipe #dinner

What are dan dan noodles?
Dan dan noodles or dan dan mian, are a super popular spicy Sichuan street food. Noodles are tossing a spicy sauce served up with preserved pickled vegetables and minced pork. They can be dry or in soup. Sesame paste is often added for a contrast to the spice as well as a nice nutty note.

What do dan dan noodles taste like?
These dan dan noodles taste spicy, savory, and nutty with a little hint of malty vinegar. They’re full of flavor and so good.

This super easy cheater’s dan dan noodles is fast, flavorful, and vegetarian to boot. It’s definitely the answer to: what’s for dinner tonight. #dandannoodles #dandan #vegetarian #noodles #chinesefood #betterthantakeout #sesamenoodles #peanutnoodles #recipes #recipe #dinner

Tips
This is cheater’s dan dan, so don’t worry too much about the ingredients. Obviously homemade chili oil is best, but here store bought is the way to go. We like this brand, which is available in lots of stores and online.

Ditto on the black vinegar and sesame paste. Chinese sesame paste is really different from tahini. Just by looking at it, you can tell that Chinese sesame paste is a lot darker and thicker. This is because it’s made from toasted un-hulled sesame seeds whereas tahini is make from untoasted hulled sesame seeds. Chinese sesame paste has a deeper toasted nutty note.

If you need to, you can sub the Chinese sesame paste with natural, unsweetened peanut butter mixed with a bit of extra toasted sesame oil. For the black vinegar, you can sub balsamic or any vinegar you have on hand. It won’t be quite the same, but this is cheater’s dan dan after all!

Happy spicy noodle bowl eating!

This super easy cheater’s dan dan noodles is fast, flavorful, and vegetarian to boot. It’s definitely the answer to: what’s for dinner tonight. #dandannoodles #dandan #vegetarian #noodles #chinesefood #betterthantakeout #sesamenoodles #peanutnoodles #recipes #recipe #dinner

Easy 10 Minute Spicy Garlicky Cheater’s Dan Dan Noodles

This super easy version of dan dan noodles is fast and flavorfulServes 2Prep Time 1 minCook Time 4 mins

Ingredients

  • 2 tbsp Chinese sesame paste
  • 2 tbsp chili oil or to taste
  • 2 tbsp soy sauce
  • 2 tsp black vinegar
  • 2 tsp sugar
  • 1-2 cloves garlic finely minced
  • 2 servings noodles of choice
  • toasted sesame seeds if desired

Instructions

  • In a large bowl, mix together the sesame paste with the the chili oil, soy sauce, vinegar, sugar, and garlic.
  • Cook the noodles according to the package instructions. Save 1/4 cup of the cooking water, then drain well.
  • Toss the noodles with the sauce, loosening with hot noodle water if too thick.
  • Enjoy topped with toasted sesame seeds and extra chili oil.

Roasted Red Pepper Pasta with Grilled Chicken

Roasted Red Pepper Pasta – A creamy, hearty pasta dish packed with roasted red pepper  flavor and tender pieces of grilled chicken breasts. A recipe the whole family can agree on!

Creamy Roasted Red Pepper Pasta with Grilled Chicken

Creamy Roasted Red Pepper Pasta With Grilled Chicken

Do I ever not add grilled chicken to pasta? 🙂 I love grilled chicken with pretty much any meal and it goes so well with pasta so yes you do find it in a lot of pasta recipes I share, and it pairs perfectly with this Roasted Red Pepper Pasta.

Add the chicken is a great way to add lean protein to your meal and I just love the flavor of grilled chicken. If course if you’d prefer to make it vegetarian you can make it without the chicken.

Creamy Roasted Red Pepper Pasta with Grilled Chicken | Cooking Classy

his pasta sauce is so easy to make and it’s deliciously flavorful thanks to those roasted red peppers. And I went the cheater route here to keep this simple for weeknight meals and just used roasted red peppers in the jar. If you wanted to roast your own it would probably be about 3 fresh.

Note that your sauce will be more of a creamy-ish red/orange/pink just when finished but as it sites for a few minutes it will get this bright orange/redish color (which is so hard for me to take a picture of btw, I know these pictures are kind of wow. I hate oranges), so just fyi if you are wondering why yours isn’t quite as bold.

Either way this pasta is delicious and it makes for the perfect weeknight meal! If you don’t have both fresh basil or parsley feel free to use one or the other.

Close up image of creamy Roasted Red Pepper Pasta with Grilled Chicken

Creamy Roasted Red Pepper Pasta

A creamy, hearty pasta dish packed with roasted red pepper flavor and tender pieces of grilled chicken breasts. A recipe the whole family can agree on!Servings: 6Prep Time15 minutesCook Time20 minutesTotal Time35 minutes

Ingredients

  • 1 lb boneless skinless chicken breasts , grilled and sliced into strips*
  • 12 oz. dry liguine or fettuccine pasta
  • 2 Tbsp butter
  • 1/3 cup finely chopped shallot
  • 1 Tbsp minced garlic
  • 1 1/2 Tbsp flour
  • 1 1/4 cups milk
  • Salt and freshly ground black pepper
  • 1/4 cup heavy cream
  • 1 (16 oz) jar roasted red bell peppers, drained
  • 1/2 cup finely shredded parmesan cheese , plus more shredded or shaved for serving
  • 2 Tbsp each chopped fresh basil and parsley

Instructions

  1. Bring a large pot of salted water to a boil and cook pasta according to directions on package to al dente. Meanwhile, melt butter in a saute pan over medium heat. Add shallot and saute 2 minutes or until lightly golden then add garlic and saute 30 seconds longer. Add flour and cook, stirring constantly 1 minute. While whisking slowly pour in milk. Season with salt and pepper to taste and cook until it begins to thicken then reduce heat slightly, stir in cream, bell peppers and parmesan and cook just until parmesan has melted. Pour mixture into a blender, cover and blend until peppers are nearly pureed (some small chunks are fine). Return sauce to pot then add drained pasta to sauce, toss to evenly coat and heat and toss over low heat for a minute to allow some of the sauce to soak into pasta. Toss in 1 Tbsp of basil and parsley. Plate and top with grilled chicken, parmesan and remaining basil and parsley. Serve immediately.
  2. *To grill chicken – preheat a grill to 425 degrees. Pound thicker parts of chicken to even thickness (or if they are very thick just slice in half through the thickness to get two portions). Brush chicken lightly with olive oil then season both sides with salt and pepper. Brush grill grates lightly with oil and grill rotating once halfway through cooking until center of chicken registers 165, about 7 – 8 minutes total. Then transfer to a plate, cover with foil and let rest 5 – 10 minutes before slicing.

Mini Japanese Soufflè Pancakes

Mile High Mini Japanese Soufflé Pancakes Recipe

Long weekends are made for mini mile high Japanese soufflé pancakes.Posted May 26, 2019 by Stephanie

Aren’t these the cutest pancakes ever?! Ever since I made the regular size Japanese soufflé pancakes, I’ve been wanting to make mini ones. Well, what actually happened was that I was talking about them so much, trying to figure out what other ways I could make them fun . And here we are. I think I might even like the mini ones more than the regular.

For one thing, they’re bite-sized and adorable. For another, they’re actually easier to make because they’re mini. They’re easier to flip and they cook a bit faster. The cook time on them is important because they need to be fully cooked or they’re deflate.

Here are some tips on making Japanese soufflé pancakes, either mini or regular size!

  1. The number one tip is: make sure you have properly whipped meringue. That means, ensure that all of your egg white whipping utensils are free of fat or oil (give everything a good wash in hot soapy water), use cream of tartar to add some stability, and add the sugar in bit by bit. The egg whites are done when you lift the beater from the bowl and they hold a peak. If you tilt the bowl, the white should not slide and there should be no more water whites left.
  2. Separate your eggs while they’re cold, but beat them when they’re room temp – room temp eggs beat up fluffier.
  3. When you’re incorporating the egg whites into the yolks, use a whisk so you don’t deflate your whites too much). Add 1/3 of the whites to the yolks, and whisk while turning the bowl, using a tapping motion. Stir 5-6 times in a circular motion, then add the next 1/3 meringue and do the same motions, being sure to scoop up the batter with the whisk. Add the last 1/3 of the meringue with the same motions then switch to a spatula to fold and mix throughly.
  4. The batter is ready when it can hold it’s own shape. When you lift some of it up with the spatula and let it settle down, it’ll still be a blob with no slumping or sinking.
  5. Low heat is key. It takes a really long time to cook these pancakes because the low heat makes sure that the pancakes are cooked through evenly. You can add a couple of drops of water to the pan before covering to encourage steaming.
  6. Make sure the pancakes are cooked long enough before adding the second bit of batter. If they aren’t cooked enough, they won’t have enough structure to hold up the new batter and they will sink and deflate more than if you take the time to let the first bit cook long enough.
  7. In the same vein, make sure the pancakes are cooked enough before you flip them otherwise flipping them will cause them to deflate even more.
  8. Also, make sure the pancakes are fully cooked removing them from the heat. They will deflate a little bit – that’s the nature of soufflés, even regular French ones. Time everything right so when they come out of the pan, you’re ready to eat.

Hope that helps and fluffy pancakes (mini or big) are in your future!

Mile High Mini Japanese Soufflé Pancakes Recipe | www.iamafoodblog.com

    MILE HIGH MINI JAPANESE SOUFFLÉ PANCAKES RECIPEMAKES 10 MINI PANCAKESPREP TIME: 20 MINUTESCOOK TIME: 20 MINUTESTOTAL TIME: 40 MINUTES

Yolks

  • 1 egg yolk
  • 1 tablespoon sugar
  • 2 tablespoons milk
  • 3 tablespoons (30 grams) flour
  • 1/4 teaspoon baking powder

Whites

  • 2 large egg whites
  • 1/8 teaspoon cream of tartar
  • 1.5 tablespoons sugar

adapted from Japanese Everyday Food

Notes: I’ve only made one batch at a time but I think you’d be able to double this as long as your meringue is whipped properly – from what I can tell, in Japan they don’t make the pancake batter every time you order, so I’m pretty sure it’ll hold.

Whisk the egg yolk with 1 tablespoon of sugar until pale and frothy. Mix the milk in batches. Sift the flour and baking powder over the yolk mixture and whisk well making sure everything is incorporated.

Whip the egg whites with the cream of tartar until frothy and pale, adding in the sugar in bit at a time until the whites are whipped into a glossy thick meringue that holds a peak. Be careful not to over whip.

Take 1/3 of the whipped egg whites and whisk it into the bowl with the yolks until completely incorporated. Add half of the remaining whites and whisk into the yolk batter, being careful not to deflate. Transfer the egg yolk mixture to the remaining egg whites, whisk and then use a spatula to fold together.

Heat up a large non stick frying (with a lid) pan over low heat. Very lightly brush with oil and use a paper towel to rub it around. You want a very light film.

Using an ice cream scoop or measuring spoon, scoop 2 tablespoons of the batter onto the pan, leaving space in between. Cover and cook for 3 minutes. If you have a crepe maker or griddle with a lid that will cover the entire thing without touching the pancakes, use that on the lowest setting.

Remove the lid and add some more batter (about 1 tablespoon) on top of each pancake. Cover and continue to cook for 4-5 more minutes. Lift the lid and use a spatula to gently peek under the pancake. The pancake should release easily – don’t force it.

If you still have any batter left, pile it on top of the pancakes and then gently flip. Cover and cook for 5-6 minutes. The pancakes will grow even taller and fluffier when they’re done. Once the pancakes are golden and cooked through, gently remove and serve on a plate with powdered sugar, butter, whipped cream, and maple syrup. Enjoy immediately!

WHY does microwaved eggs explode?

Be the most interesting person you know, subscribe to LiveScience.

Why Microwaved Eggs Explode

exploded hard boiled egg

Superheated liquid inside an egg is likely the cause of an explosive pop heard when an egg is microwaved in its shell.(Image: © montreep/Shutterstock.com)Advertisement

Hot splatter on your tongue, loud ringing in your ears — these are the consequences of biting a microwaved egg without thinking.

Hard-boiled eggs don’t react well (or, depending on the perspective, react extremely well) to microwaves. Heat one up in a microwave and — assuming it doesn’t burst while the timer is still running — there’s a good chance it will go off with a pop and a rain of hot gloop as soon as it’s disturbed.

But just how loud is  that pop? That’s the subject of a lawsuit — and a related scientific discovery — hinging on the acoustics of exploding eggs.

Somewhere in America, sometime in the past (the details remain unclear) someone walked into a restaurant and bit into an egg. That egg had been reheated in a microwave, and exploded when the poor patron bit through its benign-looking skin. The patron, severely burned, sued the restaurant, and claimed to have suffered hearing loss from the pop in addition to the more obvious wounds, according to a news realease.

Charles M. Salter Associates, a San Francisco-based firm specializing in acoustics, was hired to offer expert testimony in the litigation. Specifically, they were hired to answer this question: Could an exploding egg create a powerful-enough pressure wave to cause hearing damage?

In an unpublished paper presented today (Dec. 6) at the 174th Meeting of the Acoustical Society of America and provided to Live Science, researchers Anthony Nash, vice president of Charles M. Salter Associates, and Lauren von Blohn, an acoustics consultant at the company, described the results of their study of exploding microwaved eggs.

Nash and von Blohn individually microwaved nearly 100 shelled, hard-boiled eggs for their study. Because the eggs sometimes burst while still cooking in the microwave, the researchers placed them inside thin socks before dropping them in beakers of water to heat up.

Then they — carefully — pulled the eggs out of the flask in the microwave and placed them on the floor. With a precise microphone just a foot away, they pierced the eggs with fast-acting meat thermometers, causing some of them to explode.

The pops they were recording were pretty loud, with pressure waves peaking between 86 and 133 decibels. That was akin to the sound of a typical motorcycle running 30 feet (9.1 meters) away to the sound of a jet plane 100 feet (30 m) away, respectively. An exploding egg certainly generates more noise than you’d want to subject yourself to for any length of time, but has a „low probability” of being loud enogh to damage your hearing in a single pop.

Why does an egg explode at all?

If you stick a potato in the microwave without piercing its skin first, steam pressure can build up under the skin and cause the potato to detonate. That’s a simple mechanism for an explosion, the researchers wrote, similar to a grenade boing off and shattering the device’s outer shell.

But a hard-boiled egg doesn’t have a skin with the high tensile strength of a potato’s, and an eggshell — designed for a baby bird to peck through — isn’t strong enough to contain high internal steam pressure. There is a membrane between the white of an egg and its shell that might allow pressure to build up, but that comes off when you shell an egg and shelled eggs still pop.

The researchers suggested an alternative explanation.

The yolk of an egg, they discovered with their meat thermometer, heats up much faster than the surrounding water. Perhaps, they reasoned, tiny pockets of water are getting trapped inside the proteins and getting superhearted.

At normal air pressure, those pockets would have room to expand and turn into steam. But inside an egg, pressure from surrounding, hardening proteins might be forcing the pockets to remain liquid even as their temperatures climb.

But disturb one of those pockets, let it expand, and the water molecules would rush to fill the void — expanding, disrupting the surrounding tissue, and allowing any other pockets to flash through a phase change at the same time. The resulting collective bubble-bursting would tear the egg to bits, flinging the pieces far and wide in a way that might resemble a more typical explosion under pressure.

„To an observer, the egg appears to have exploded,” the researchers wrote in the paper, but, „it is probably more accurate to describe the phenomenon as a rapid boiling of superheated water.”

Proiectează un site ca acesta, cu WordPress.com
Începe